Programming Mode
This section describes how to start programming the KUKA LBR iiwa 14 R820, write custom applications that can be launched on the teaching pendant.
Note
Programming is done on a laptop (NNUF laptop 1, the Lenovo T14s).
Connecting to the Robot
- To connect the laptop to the robot, do the following steps (see Fig. 19):
Connect the Ethernet cable to the robot’s X66 port (above the power switch) and to the laptop.
Change the network settings of the laptop so that the ipv4 settings with IP address
172.31.1.100and subnet mask of255.255.255.0.Launch Sunrise Workbench.
Ping the Cabinet, open Command Prompt, and write
ping 172.31.1.147.
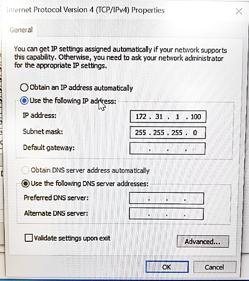
Fig. 19 KUKA iiwa Network settings
Note
Make sure the networking configuration looks like the one in Fig. 20.
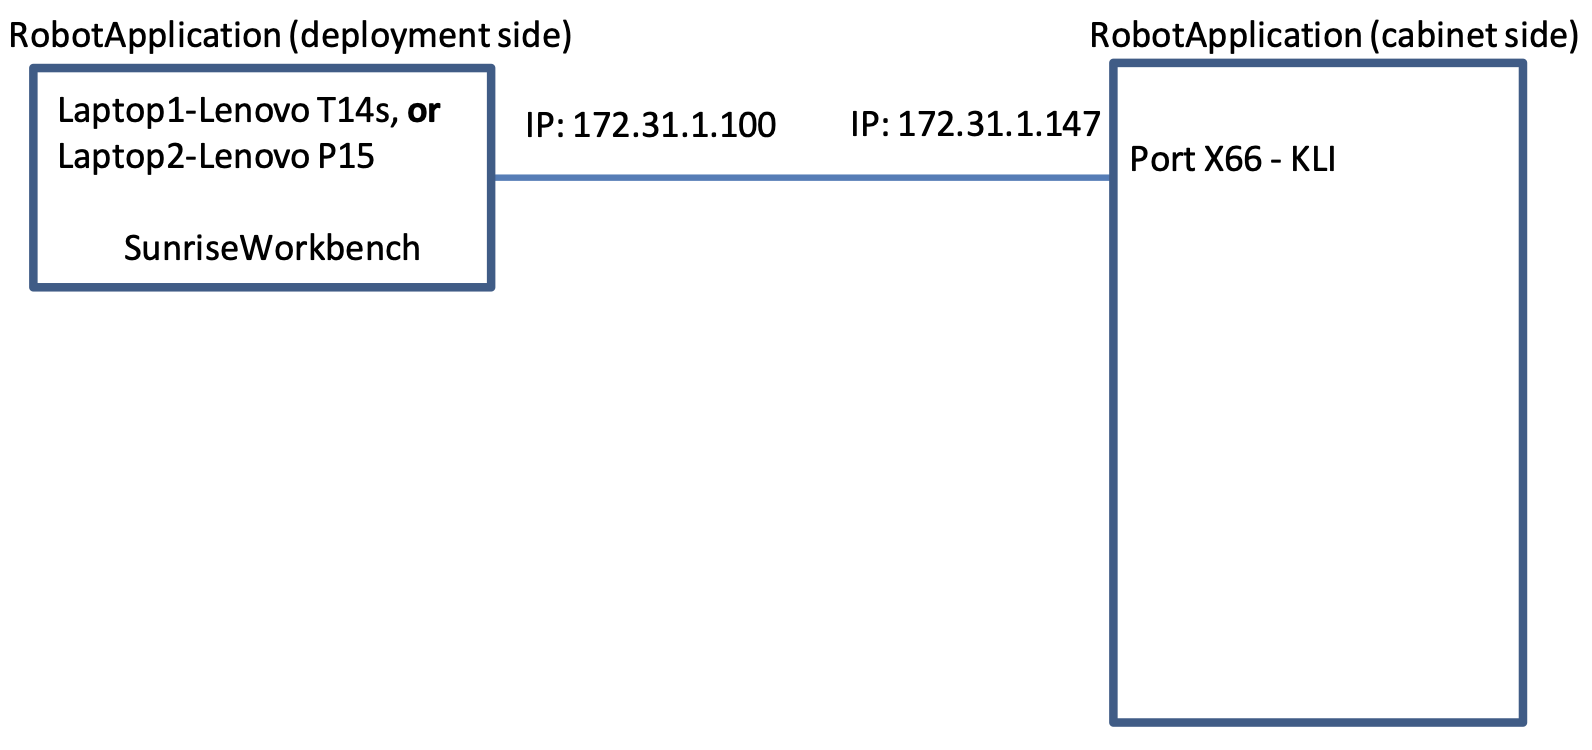
Fig. 20 KUKA iiwa Network architecture
Hello World without FRI
To start the robot without FRI (Fast Robot Interface), do the following steps:
In case we start from scratch (never programmed the robot before), start by creating a new folder (say on desktop) that will play the role of workspace: give it a name, say,
SunriseWorkbench_<yourName>(e.g. SunriseWorkbench_AnthonyChen).Open Sunrise workbench (click the link on the Desktop). A window opens asking for the workspace folder. here indicate the folder you have created at the previous step.
This step describes uploading all projects from robot controller to laptop. Follow the instructions on Kuka workshop. KUKA iiwa basic programming_manual_woNotes.pdf, Section 11.6, page 101.
Write your first application. In Sunrise workbench, on the left window go to
<ProjectName> -> src -> application, then right click onapplication -> New -> Sunrise Application, select one of the templates from the list, namelyRoboticsAPIApplication, as shown on the figure Fig. 22. ClickNextand give it a name on the next screen, say ‘<your initials>_HelloWorld1’, e.g. MM_HelloWorld1 for the user Murilo Marinho. Then click on theFinishbutton.This step describes deploying a project from laptop to robot controller. Follow the instructions on Kuka workshop,
KUKA iiwa basic programming_manual_woNotes.pdf, Section 11.5.2, page 100. When the Authorization windows opens, provide the passwordkuka(without quotes, all lowercase letters) and selectExpert. Alternatively, select Use group,Safety maintenance technician, and the Password,argus(without quotes, all lowercase letters).Check that your application exists on the teach pendant and that it runs as expected. PAD -> Applications -> <your initials>_HelloWorld1.
Note
The “Synchronize” button used to deploy the application to the Cabinet is located on the ribbon on top. See Fig. 23.
Note
Make sure no active application is running on the teaching pendant, otherwise you will get an error.
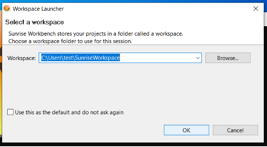
Fig. 21 KUKA Sunrise Workbench
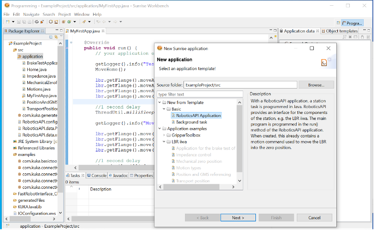
Fig. 22 KUKA Sunrise Application

Fig. 23 KUKA Sunrise Synchronize
Hello World with FRI
This section shows how to start programming the KUKA LBR iiwa 14 R820 arm such that the application communicates in real-time (i.e. at/during runtime) with a so-called client program running on a separate laptop. Running (launching) the application involves using the teaching pendant.
First, make sure the network configuration is looking like the one in Fig. 24.
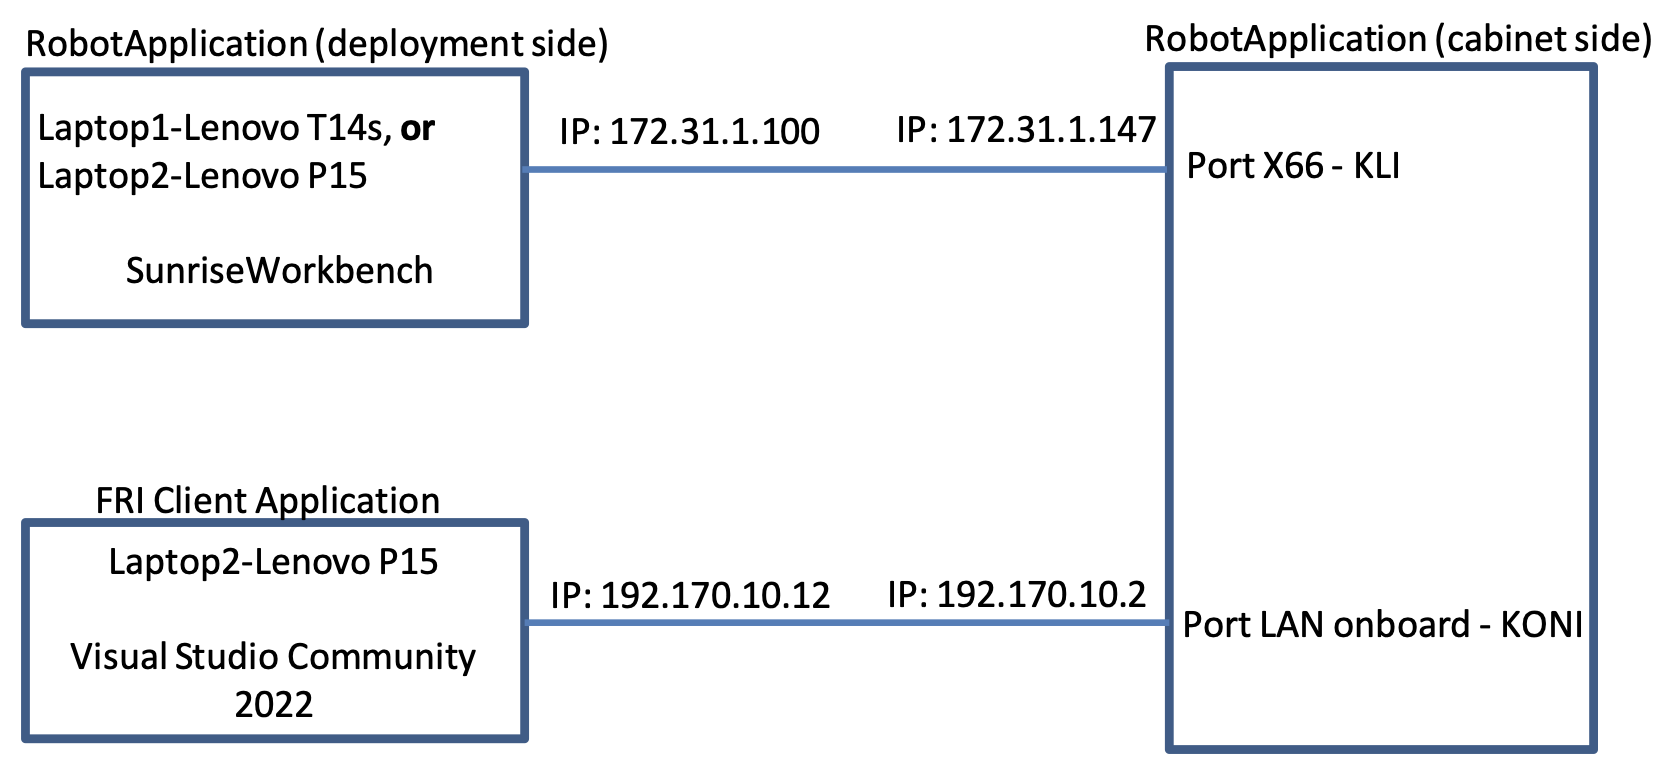
Fig. 24 KUKA iiwa Network architecture FRI
to check the IPs of the Cabinet, use Laptop1-Lenovo T14s, open SunriseWorkbench -> Package Explorer,
then go down and click on StationSetup.cat, then select Configuration tab. A window will appear (see Fig. 25).
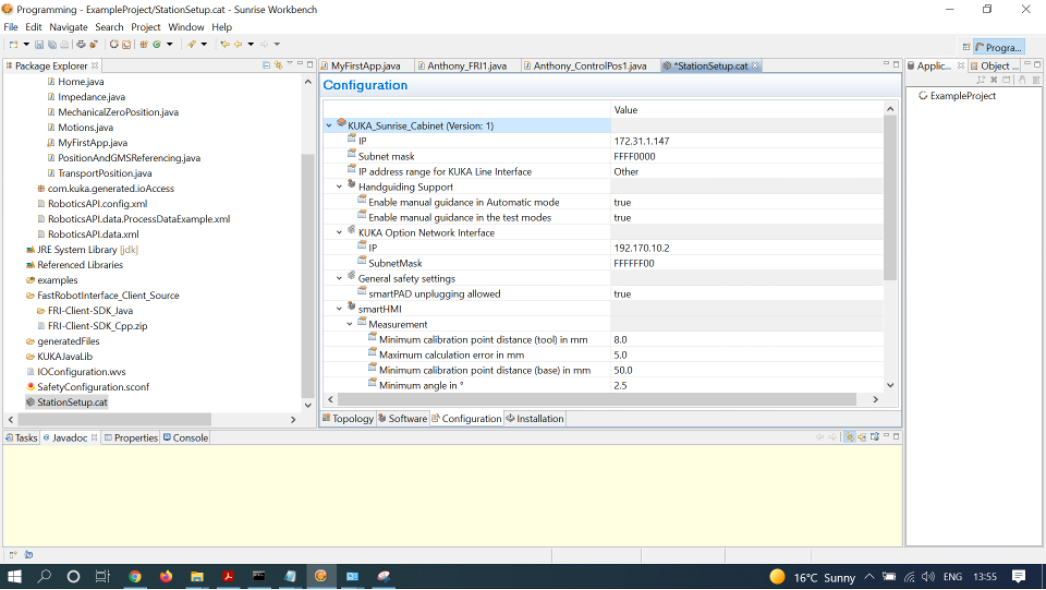
Fig. 25 KUKA Sunrise Station Setup
Note
For more information related to Networking, use the KUKA Sunrise.OS 1.16 KUKA Sunrise.Workbench 1.16, Operating and Programming Instructions for System Integrators
Note
The pdf accessible on the Transcend 32GB white usb stick with KUKA marked on it, located in the transparent box under the robotic arm -> search within the document for StationSetup.cat
To start the robot with FRI, do the following steps:
In Laptop1-Lenovo T14s go to Sunrise workbench, on the left window go to <ProjectName> -> src -> application, then right click on application -> New -> Sunrise Application, select one of the templates from the list, namely
RoboticsAPI Application, as shown on the figure Fig. 26. ClickNextand give it a name on the next screen, say<your initials>_RealTime_FRI_App1, for example MM_RealTime_FRI_App1 for the user Murilo Marinho. Then, copy-paste the content Code KUKA Sunrise Application, making sure to change the text accordingly (the name of the application, e.g. Anthony_RealTime_FRI_App1 should match the name of the class and the object instantiation).In teaching pendant because the application
RealTime_FRI_App1has already been loaded to the Cabinet in a previous step, it can now be selected via the teaching pendant. For that, select PAD -> Applications -> RealTime_FRI_App1, which will executehomingto a particular location then wait for info from FRI client.In Laptop1-Lenovo T14s make sure to read
section 6.4, Creating the FRI client application (C++), page 41`` of the manualkuka_FRI_PL-2303HX product brochure 011706.pdf(file accessible via SunriseWorkbench -> Help -> Help Contents. The fileFastRobotInterface_Client_Source/FRI-Client-SDK_Cpp.zipcan be found on SunriseWorkbench -> PackageExplorer -> right click on FastRobotInterface_Client_Source -> select Properties -> take a look at Location. Now, Open Win10 Explorer, then go to the Location indicated above, copy the fileFRI-Client-SDK_Cpp.zipsomewhere on Laptop2-Lenovo P15 or alternatively on a usb stick.In Laptop2-Lenovo P15 Unzip the archive
FRI-Client-SDK_Cpp.zipsomewhere on the local ssd, then open the filebuild/MSVisualStudio2010/FRIClientSDK.slnin Visual Studio Community 2022, e.g. by double-clicking that file. A pop-up message might appear saying One or more projects in the solution were not loaded correctly…. Justclick OK. Then, click OK in case window appears (see Fig. 28). Click thegreen Playbutton to run the program LBRJointSineOverlay (see Fig. 29).To teach the pendant, run the app according to Step2. You should see the robot doing sine waves (up-down motion), as requested by the FRI Client.
[Optional] In case you want to test another program from the list in Solution Explorer [the right-hand side window], right click on it then select “Set as Startup Project, then click the green Play button again. If the application
RealTime_FRI_RobotApp1is active, we should see the robot arm executing an up-down [sine wave] motion.
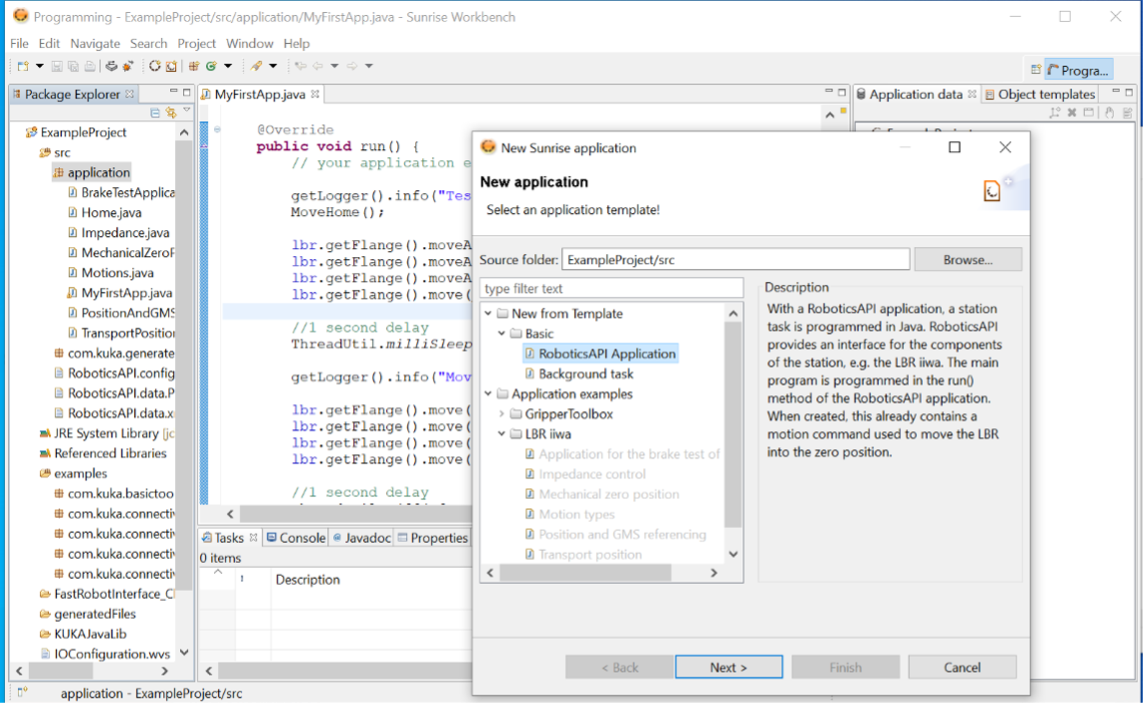
Fig. 26 KUKA Sunrise Application
package application;

/*
Import KUKA LBR packages
*/
import static com.kuka.roboticsAPI.motionModel.BasicMotions.ptp;

import com.kuka.roboticsAPI.applicationModel.RoboticsAPIApplication;
import com.kuka.roboticsAPI.deviceModel.LBR;
import com.kuka.roboticsAPI.motionModel.PositionHold;
import com.kuka.roboticsAPI.motionModel.controlModeModel.JointImpedanceControlMode;
import com.kuka.roboticsAPI.controllerModel.Controller;

/*
Import KUK FRI package
*/
import java.util.concurrent.TimeUnit;
import java.util.concurrent.TimeoutException;

import com.kuka.connectivity.fastRobotInterface.FRIChannelInformation;
import com.kuka.connectivity.fastRobotInterface.FRIConfiguration;
import com.kuka.connectivity.fastRobotInterface.FRIJointOverlay;
import com.kuka.connectivity.fastRobotInterface.FRISession;

public class RealTime_FRI_RobotApp1 extends RoboticsAPIApplication {
    //Define a LBR object
        private LBR lbr_7_800;
        private Controller lbr_7_800_Ctrl;
        private String FRI_ClientIP;

    @Override
    public void initialize() {
        // initialize your application here
                //lbr_7_800 = getContext().getDeviceFromType(LBR.class);

                //*********
                //Define the lbr object and lbr controller object
                //*************/
                lbr_7_800_Ctrl = (Controller) getContext().getControllers().toArray()[0];
                lbr_7_800 = (LBR) lbr_7_800_Ctrl.getDevices().toArray()[0];
                // **********************************************************************
                // *** change next line to the FRIClient's IP address                 ***
                // **********************************************************************
                FRI_ClientIP = "192.170.10.12";
    }

    @Override
    public void run() throws Exception {
        //Initilise the control mode
        JointImpedanceControlMode ctrMode = new JointImpedanceControlMode(200, 200, 200, 200, 200, 200, 200);
        ctrMode.setDampingForAllJoints(0.5);
        //configure the robot to position hold mode
        PositionHold posHold = new PositionHold(ctrMode, -1, TimeUnit.SECONDS);
        //lbr_7_800.getController().getExecutionService().cancelAll();
        lbr_7_800.move(ptp(0,Math.toRadians(30),0,-Math.toRadians(90),0,-Math.toRadians(30),0).setJointVelocityRel(0.3));
        //lbr_7_800.move(ptp(Math.toRadians(40),Math.toRadians(40),Math.toRadians(40),Math.toRadians(40),Math.toRadians(40),Math.toRadians(40),Math.toRadians(40)).setJointVelocityRel(0.3));
        // configure and start FRI session
        FRIConfiguration friConfiguration = FRIConfiguration.createRemoteConfiguration(lbr_7_800, FRI_ClientIP);
        friConfiguration.setReceiveMultiplier(1);
        friConfiguration.setSendPeriodMilliSec(1);//Important: This number should be smaller than 10 for joint-position based control

        getLogger().info("Creating FRI connection to " + friConfiguration.getHostName());
        getLogger().info("SendPeriod: " + friConfiguration.getSendPeriodMilliSec() + "ms |"
                + " ReceiveMultiplier: " + friConfiguration.getReceiveMultiplier());

        FRISession friSession = new FRISession(friConfiguration);
        FRIJointOverlay jointOverlay = new FRIJointOverlay(friSession);


        // wait until FRI session is ready to switch to command mode
        try
        {
            friSession.await(10, TimeUnit.SECONDS);

        }
        catch (final TimeoutException e)
        {
            //If there is no connection, then close the FRI session
            getLogger().error(e.getLocalizedMessage());
            friSession.close();
            return;
        }

        getLogger().info("FRI connection established.");
        lbr_7_800.move(ptp(0,Math.toRadians(30),0,-Math.toRadians(90),0,-Math.toRadians(30),0).setJointVelocityRel(0.3));

        // (friSession.getFRIChannelInformation().getQuality() == Conn_Qaulity)
        boolean App_Run = false;
        FRIChannelInformation.FRIConnectionQuality Conn_Quality = friSession.getFRIChannelInformation().getQuality();
        if ((Conn_Quality == FRIChannelInformation.FRIConnectionQuality.EXCELLENT) ||(Conn_Quality == FRIChannelInformation.FRIConnectionQuality.GOOD))
        {App_Run = true;}
        try
        {
            while (App_Run)
            {
                //JointPosition JointPos = lbr_7_800.getCurrentJointPosition();
                /****
                //This is the first working version
                lbr_7_800.moveAsync(ptp(.0, .0, .0, .0, .0, .0, .0).addMotionOverlay(jointOverlay));
                */
                lbr_7_800.moveAsync(posHold.addMotionOverlay(jointOverlay));
                Conn_Quality = friSession.getFRIChannelInformation().getQuality();
                if ((Conn_Quality != FRIChannelInformation.FRIConnectionQuality.EXCELLENT) && (Conn_Quality != FRIChannelInformation.FRIConnectionQuality.GOOD))
                {App_Run = false;}
                //getLogger().info(String.valueOf(friSession.getFRIChannelInformation().getJitter()));
                //getLogger().info(String.valueOf(friSession.getFRIChannelInformation().getLatency()));
            }
        }
        catch(Exception run_err)
        {
            friSession.close();
            getLogger().error(run_err.getLocalizedMessage());
            getLogger().info(String.valueOf(friSession.getFRIChannelInformation().getLatency()));
            return;
        }

        friSession.close();
        getLogger().info("FRI connection ended.");

        //Close the FRI session if the programme is done.

    }

    public static void main(final String[] args)
    {
        final RealTime_FRI_RobotApp1 app = new RealTime_FRI_RobotApp1();
        app.runApplication();
    }
}
Note
The code highly inspired from Kaiqiang knowledge transfer folder -> LBR program [needs FRI] -> RealTime_FRI_Template.java.
Note
The important parts of the code are the FRI_ClientIP variable, and the name of the class which should appear when we create an object inside public static void main(). Click on Synchronize to deploy the application to the Cabinet (see Fig. 27).

Fig. 27 KUKA iiwa Bar
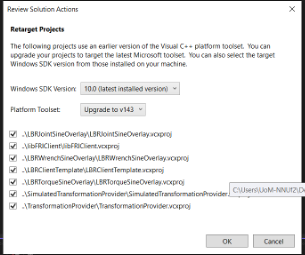
Fig. 28 KUKA iiwa Visual Studio 2010
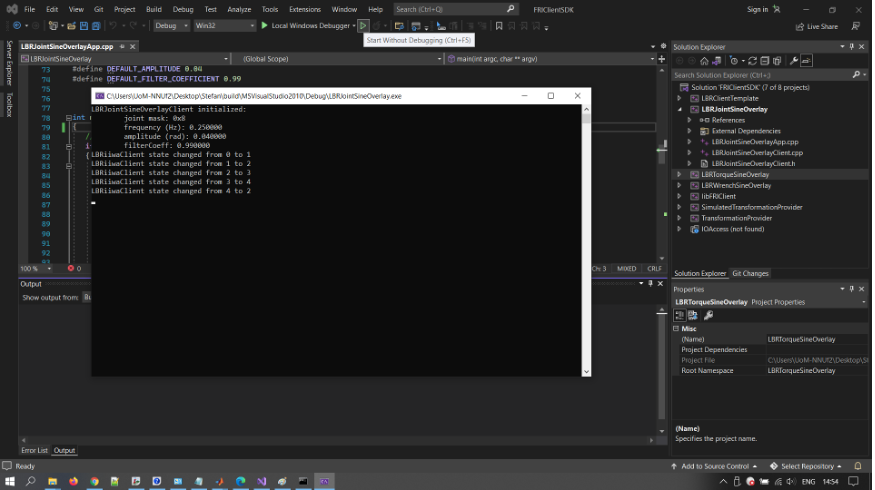
Fig. 29 KUKA iiwa Run Program
Note
In case you can only see the first 5 lines indicated in the command window Fig. 29, but not the other lines of code like LBRiiwaClient state changed from…, this might be because you skipped Step4.
Note
In case the command window Fig. 29 shows a few lines of LBRiiwaClient state changed from …, then the program stops unexpectedly, this might be due to the quality of the networking connection being judget too low. You might try: 1. Make sure [Laptop2-Lenovo P15] is powered on (to avoid any eco-mode enabled on the networking card); 2. Disable any other networking adapters on [Laptop2-Lenovo P15], like wifi; 3. Change the Ethernet cable – prefer one that is shielded and short; 4. Modify the C++ code above, so that it expects to receive data points at a lower frequency: replace the line below
// friConfiguration.setSendPeriodMilliSec(1);
friConfiguration.setSendPeriodMilliSec(5);//5ms instead of 1ms
Lastly, Try changing the computer [Laptop2-Lenovo P15] with another one.
Advanced development
Users intending to push the robot to its limits (in terms of velocities, torques, etc.), first need to select Auto mode
using the physical switch on the teach pendant. This will immediately trigger a Safety error that can be seen on the
teaching pendant. This needs to be dealt with from Sunrise Workbench, the right-hand side menu, click on
SafetyConfiguration.sconf file and then, on the right-hand side screen, you will see the content of row 2, as shown
in the Fig. 30 . By deleting it, the error will probably go away but the robot is deemed to be unsafe e.g.
when colliding with an object. Instead, it is better to define some safety mechanisms: see the Safety chapter from
the Integrators manual which describes what and how that can be achieved. In particular, a hardware device with a
physical switch can be built, connected via X11 to the cabinet, with 2 pairs of pins used to connect an enabling
switch – the so-called velocity mode on the error indicated on the teaching pendant.
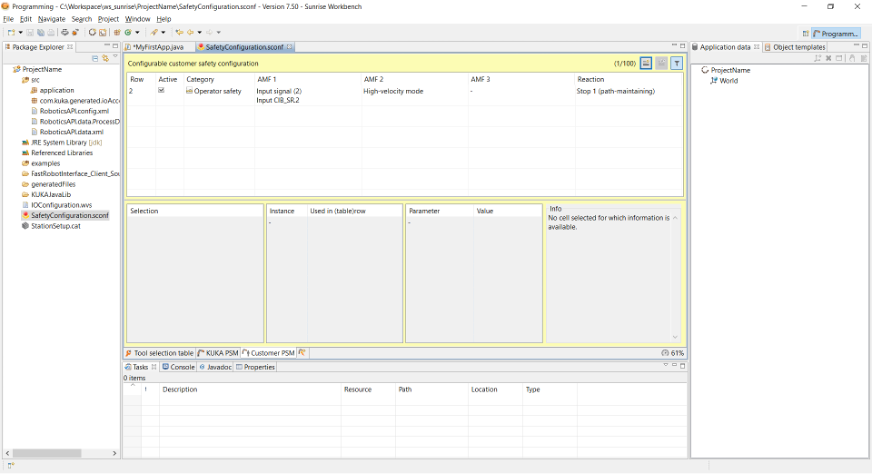
Fig. 30 KUKA iiwa Safety Configuration