UR3e StartUp
To have a better understanding of the UR3e startup procedure, you can see the videos in and of this page.
Startup Procedure
This section provides a step-by-step guide to starting up the Universal Robotics UR3e robot arm. To know more about the UR3e, visit the UR3 Documentation at Universal Robotics UR3e. Before starting up the robot arm, ensure the following:
Caution
Failure to verify the payload and installation before starting up the robot arm can lead to injury to personnel and/or property damage.
Always verify the actual payload and installation are correct before starting up the robot arm.
Caution
Incorrect payload and installation settings prevent the robot arm and Control Box from functioning correctly.
Always verify the payload and installation settings are correct.
Note
Verify the robot arm has ample space to operate freely.
Note
Starting up the robot in lower temperatures can result in lower performance, or stops, due to temperature-dependent oil and grease viscosity.
Starting up the robot in low temperatures can require a warm-up phase.
See the support article, “Best Practice for Robot Start-up in Cold Environments” on universal-robots.com.
Initialization
On your Teach Pendant, press the
power buttonto turn on the control box.Wait as text from the underlying operating system, followed by buttons, appear on the screen.
A Getting Started screen Fig. 35 can appear, prompting you to begin programming the robot.

Fig. 35 Getting Started Screen
On your first start up a Cannot Proceed dialog box can appear. Select Go to initialization screen to access the Initialize screen.
In the Footer, to the left, the Initialize button indicates the status of the robot arm using colors:
Red Power off. The robot arm is in a stopped state.
Yellow Idle. The robot arm is on, but not ready for normal operation.
Green Normal. The robot arm is on and ready for normal operation.
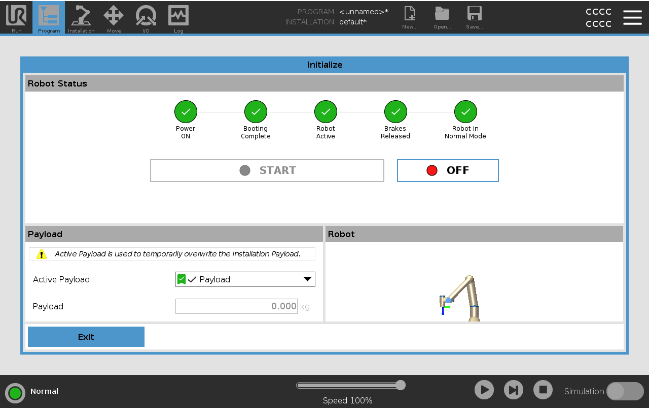
Fig. 36 Initialize Screen
Turning the Robot On/Off
To start the robot:
Tap the
ONbutton with the green LED to start the initialization process. Then, the LED turns yellow to indicate the power is on and in Idle.Tap the
STARTbutton to release the brakes.Tap the
OFFbutton with the red LED to power off the robot arm.When the PolyScope starts, tap the
ONbutton once to power the robot arm. Then, the status changes to yellow to indicate the robot is on and idle.When the robot arm state is Idle, tap the
STARTbutton to start the robot arm. At this point, sensor data is checked against the configured mounting of the robot arm. If a mismatch is found (with a tolerance of 30°), the button is disabled and an error message is displayed below it.If the mounting is verified, tap
STARTto release all joint brakes and the robot arm is ready for normal operation.
Note
Robot arm start up is accompanied by sound and slight movements as joint brakes are released.
Turning the Control Box On/Off
The Control Box mainly contains the physical electrical Input/Output that connects the robot arm, the Teach Pendant and any peripherals. You must turn on the Control Box to be able to power on the robot arm.
Note
The Teach Pendant will display the status of the control box and the robot arm once powered on.